

Arcade Cabinet Restoration
Bringing an 80’s JAMMA arcade cabinet back to life
It was a long build up to my first arcade cabinet restoration, having been involved with arcade games since I was 10 years old, and rediscovering the hobby in my 20’s. After I built my arcade shed, I went on a bit of a buying spree, snapping up knackered old cabinets on eBay without much thought as to what I would do with them. I just knew that I had a space that needed filling with cabinets, and that I needed to learn how to restore them. I didn’t want to be just a player of old arcade games, I wanted to learn what made them tick and how to bring them back to life. The BAS arcade cabinet was my first.
Sourcing the arcade cabinet
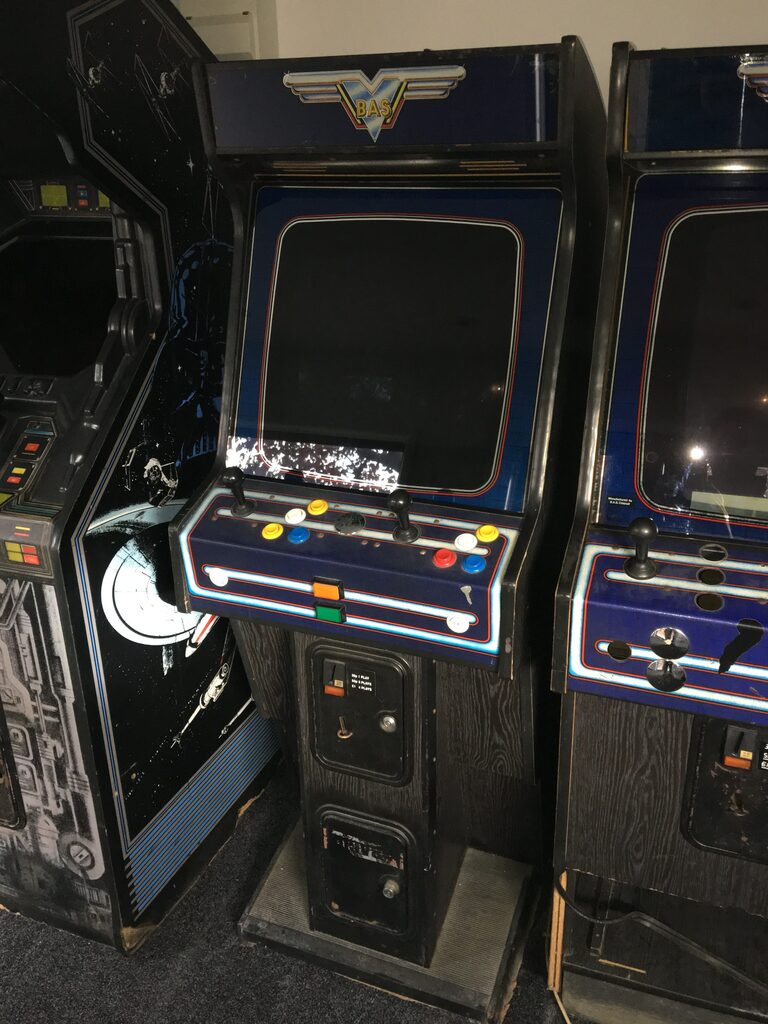
My initial purchase was a semi-working machine with a bootleg Mortal Kombat installed, this lovely old BAS branded cabinet, manufactured in the UK. I had seen a few of these knocking about on the UK forums, so I figured there would be enough people around that knew how they worked. Plus there might even be some spares available if I needed them. I managed to pick up this particular example for less than £100, a real bargain for an largely unmolested machine with what appeared to be a working monitor and PCB.
Martin the Van Man (UK king of arcade removals) delivered my BAS Arcade Cabinet along with a couple of others that I had managed to buy within a 2 week period. My first challenge was how to get them out of my hallway and down the garden before my wife came home.

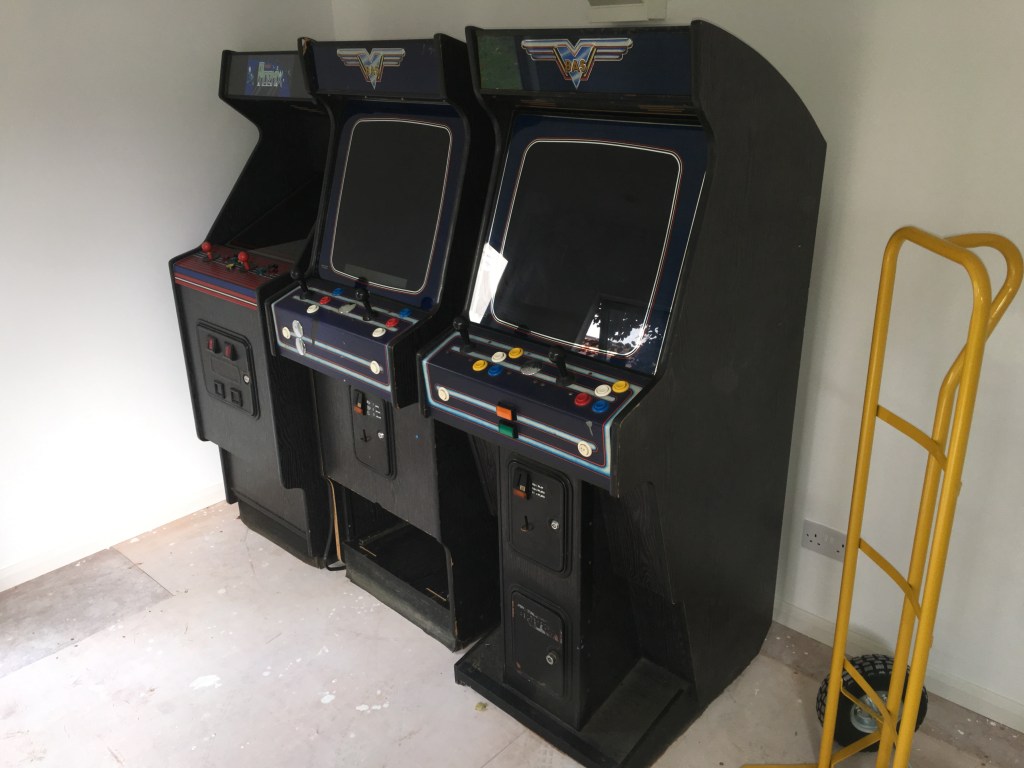
Cunningly I managed to buy 2 virtually identical BAS cabinets, thinking that I might be able to make one perfect machine from parts salvaged from both, should it come to it. I also managed to acquire another Electrocoin Midi, a great little cabinet that may or may not include my favourite game, Phoenix. But that’s another story.
Planning the arcade cabinet restoration
Safely installed in the shed, my first job was to survey both the BAS cabinets and work out which one I was going to tackle first, and the problems I would need to address. I decided that I liked the look of my donor cabinet the best, as it was actually in better physical condition than the Mortal Kombat cabinet, albeit with an untested monitor and a botched control panel.
So my to-do list for this arcade cabinet restoration became:
- Install a multi-game PCB
- Test and fix the monitor
- Repair or replace the control panel, joystick and buttons
- Fix the damaged wood on the base
- Remove all the metalwork and respray
- Replace the rubber matting on the footrest
- Replace the coin door locks (missing keys)
- Find a replacement marquee light
This was going to take some time, but I was looking forward to a project that would give me experience of every aspect of restoration, not just the cosmetics but the electronics that power these old games.
Fixing the Hantarex Arcade Monitor
The cathode ray tube is the heart of these old machines, something that can’t be replicated with modern flat screens, and I was determined to keep this original monitor in place. The other BAS machine had a working Hantarex monitor but I wanted to find out what it would take to bring one back to life as part of this arcade cabinet restoration.
First job was to test the power supply, which was producing healthy voltages to both the JAMMA connector for the game PCB, coin door and control panel (5V) and to the marquee light (12V) according to my multimeter. I had a working 60-in-1 game plugged in with flashing LEDs so I knew there was nothing wrong with the video signal being produced to the monitor. The monitor was however showing no signs of life, and no “glow” in the neck, so I decided that the chassis would need to be removed and repaired.
Safely discharging an arcade monitor
This provided me with an opportunity to test out my new HV Probe, as the tube needed to be discharged before safely handling the monitor chassis due to the high voltages that can be retained by old CRTs. After donning my wellies and pink Marigolds (not joking), and with one hand behind my back to prevent my body becoming part of a circuit, I gently placed the probe under the anode cap. Nothing. No spark, no crackle of discharge, nothing.
Comfortable that I wasn’t going to kill myself, I removed the chassis from the monitor, making sure I took pictures of all the connections so I would be able to reverse the procedure later.

I didn’t really know where to start with the repair of the chassis, so I cleaned it up with some cotton buds and some isopropyl alcohol, and sent it off to a contact on the UKVAC forum. Repairs to my Star Wars arcade machine have susbsequently taught me a lot about monitors, but at this stage I didn’t have the equipment or know-how. So I figured while the monitor chassis was being repaired I could focus on the cabinet itself.
Arcade Control Panel Repairs
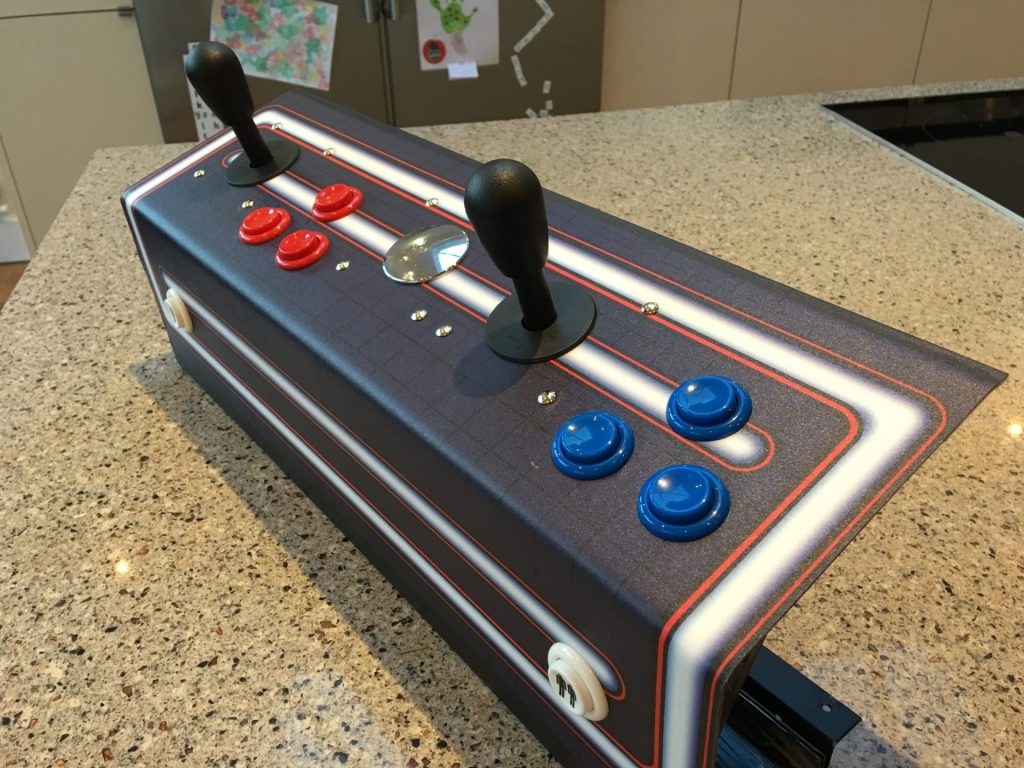
The control panel on both BAS cabinets were less than ideal, one with a standard but weird vertical button arrangement, the other with extra buttons hacked on, presumably to play Mortal Kombat. Asking around the forums I found someone with a spare BAS panel, one with a button configuration that I was happy with.

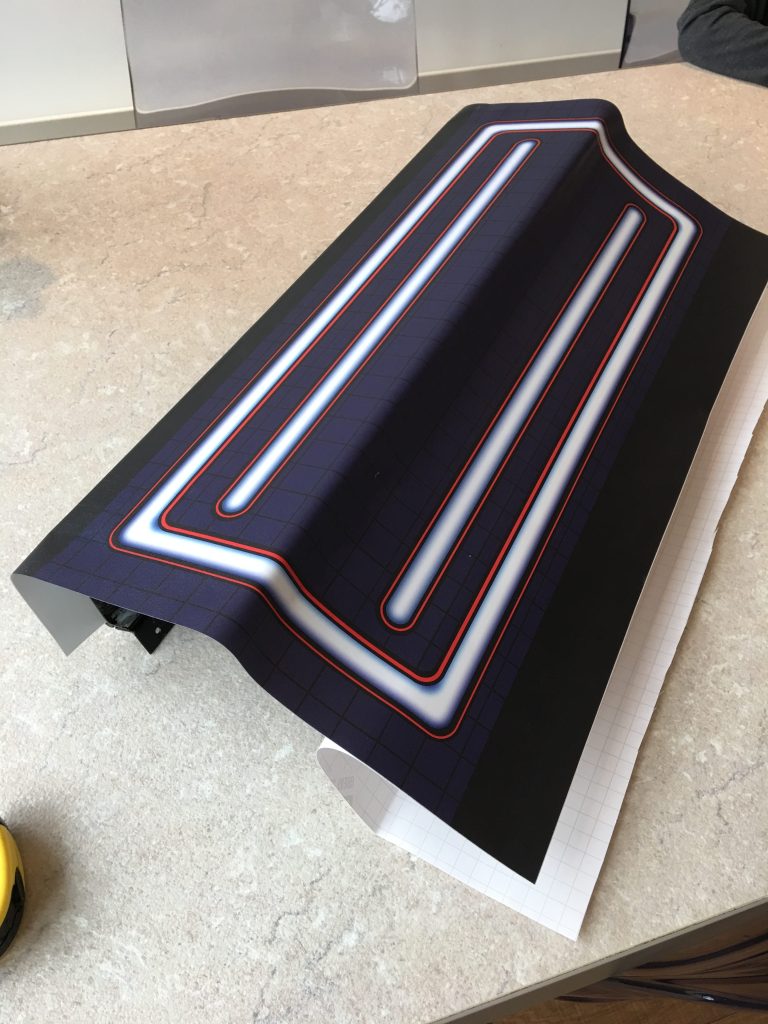
The control panel overlay had seen better days, so I decided that I would need to repair or replace it. Back to the forums, and although there was no off-the-shelf replacement available in the original design, I found a chap who was prepared to make a copy. If you are ever in need of artwork for an old arcade cabinet then I highly recommend Olly at Arcade Art Shop.
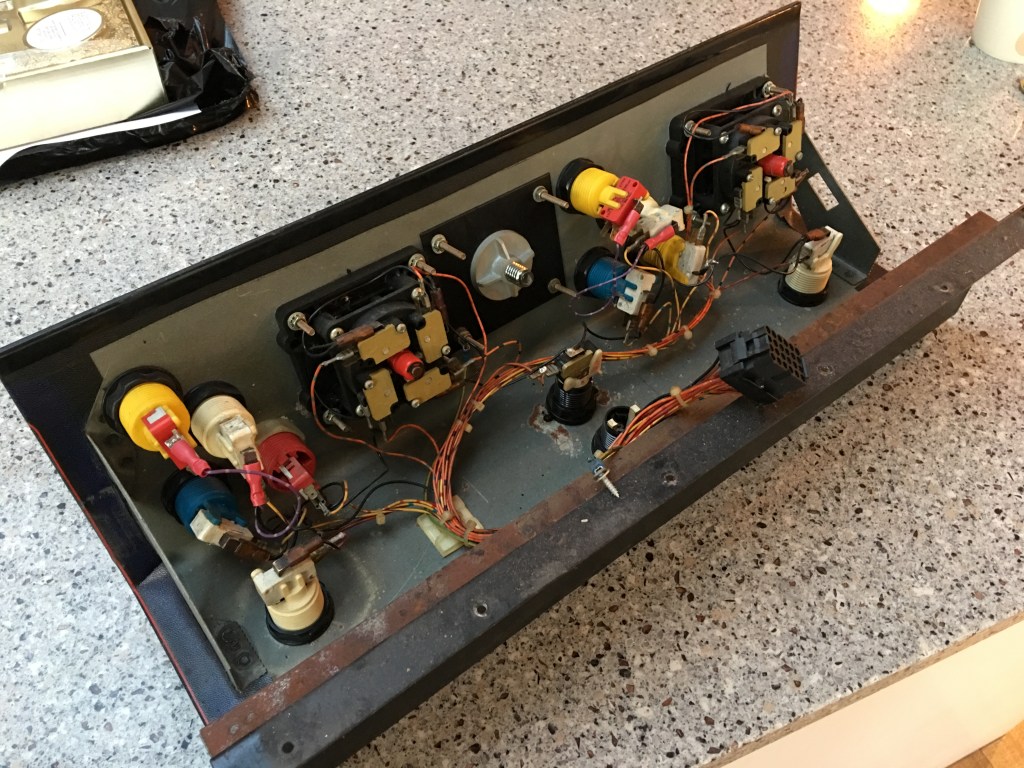
Dismantling the arcade control panel
The wiring harness in the control panel was however complete and had a molex connector for easy replacement, so I documented the wiring layout taking lots of pictures, and set about carefully removing the old buttons and joysticks. The joysticks were mismatched and a bit worn, so I planned to replace with some stock 8-way items that had left over from a previous MAME cabinet project along with some shiny new buttons. The blanking plate that covered the extra joystick hole would be salvaged and cleaned up with some Brasso in leiu of specialist plastic polish.
Applying the new arcade control panel overlay
A few weeks later and my replacement panel overlay arrived (thanks Olly from the Arcade Art Shop) looking fantastic. I treated the replacement control panel with some rust converter to tidy up any corrosion on the bare metal, and gave it a good wipe down with white spirit to remove any remaining adhesive residue and dirt that would prevent the new overlay from sticking. I then carefully applied the overlay, making sure I smoothed it down as I went and lining it up with the visible area of the control panel. Once applied, I then cut out the joystick and button holes with a craft knife, leaving some overlapping triangular sections to tuck into the hole.
Then the most satisfying part of the arcade cabinet restoration so far, pushing the buttons and the joysticks through the newly covered panel and securing with plastic nuts and shiny new chrome bolts. I was really pleased with the result, basically a good as new finish with every visible surface and component replaced, while keeping all the original internals. Now the control panel was perfect, I needed to address some of the problems with the cabinet itself.
Repairing the BAS Arcade Cabinet Woodwork
I had noticed when moving the cabinet around that there was some bulging in the cabinet edges, mainly in the bottom part of the cabin where the wood had possibly got damp and the glue holding the fibreboard together had decayed. So I tipped the cabinet onto its back (making sure the monitor and glass was secured correctly) to survey the damage.

Looking at the bottom it was fairly sound, but would need some work to stabilise the spread in the board and prevent further damage, as well as improving the looks.
Filling, sanding and painting the arcade cabinet base
I removed the loose material with a file and then applied a wood hardener to the remaining surfaces to “glue” what was left together, with the help of some clamps to push the spread wood back into place. After drying, I sanded away any remaining protruding wood, and then filled with a high performance wood filler to level the surfaces and fill any holes. After a couple of rounds of filling and sanding I was happy enough with the base to prime and paint Matt black. As most of the base is hidden with rubber mat or metal plate, it didn’t have to be perfect, just tidy.

While I had the cabinet on its back I took the opportunity to remove the t-molding and all the remaining metalwork including the coin doors so they could be treated for rust and cosmetic damage. There was a lot of visible rust and bubbling of paint so I decided to take back to bare metal rather just touching up. This is a job that many arcade restorers like to outsource, by sending the components off to a sandblaster and powder-coater for treatment, but I wanted to get my hands dirty on this first arcade cabinet restoration. Which will be the subject of my next update, as this one is getting a bit long!
Reinstalling the Arcade Monitor Chassis
But before I finish this update, I thought I would share the most exciting part of the build, as at this stage in the restoration I received an important package. The monitor chassis was back from repair, and after careful reinstallation, sprang back to life on the first power up without needing any adjustment.

Up Next in Part 2
So next up in part 2 of this arcade cabinet restoration will be the coin doors and other metalwork, the t-molding and bringing the marquee light back to life. I’ll then assemble all the refurbished parts of this lovely old BAS arcade cabinet ready to play some classic games.
Huge thanks to gunblade from the UKVAC forum and Olly from arcadeartshop.com for their help with the restoration.


One Comment