Tag Archives: Featured

Tranz Am Review for the ZX Spectrum

Ultimate’s 16k Driving Marvel

For many, the ZX Spectrum was a gift from parents that believed it would be an educational tool, like the Sinclair ZX81 before it, but in reality it was used by everyone for gaming. One game that stands out is Tranz Am, a top-down game set in a post-apocalyptic USA. Developed by Ultimate Play the Game (the developers who later became Rare), Tranz Am wasn’t just another game; it was a test of reflexes, strategy, and sheer willpower.

Tranz AM Gameplay GIF

Background of Tranz Am

Tranz Am was released in 1983, a time when the ZX Spectrum was still relatively new but already a household name among gamers. Ultimate Play the Game had already established itself with titles like JetPac, but Tranz Am was different. It combined the thrill of racing with an open-world map, something quite ambitious for its time, particularly as it was written to squeeze into only 16k of memory.

I remember first loading up Tranz Am on my trusty WH Smith data cassette player, grateful that I didn’t have to adjust the tone to improve the quality of the signal. I’d actually bought this game, rather than using a “backup copy” acquired from a friend, so it worked first time….

Gameplay Mechanics

Objective and Controls

In Tranz Am, your mission is simple: survive a Mad-Max style apocalyptic world in your dune-buggy car. You start with a limited amount of fuel and must traverse a vast map to collect the “8 Great Cups of Ultimate” while avoiding obstacles and enemy cars. The controls are straightforward: left and right to steer, forward to accelerate, and backward to decelerate. For those who preferred joysticks, the game supported that too, though many stuck to the trusty keyboard. I was always a keyboard fan, even though I had a Kempston joystick and interface.

Tranz Am gameplay screen
Tranz Am Gameplay

The Game Environment

The game’s map is a sprawling depiction of the United States, albeit a very pixelated one. Major cities are represented by clusters of buildings, where the name of the city would appear at the bottom of the screen, giving you another navigation reference. You’ll often find fuel pumps scattered around which you need to run over to refuel your car. Enemy cars, represented by different colored sprites, roam the map, ready to crash into you and end one of your 3 lives. There were also trees and boulders to avoid, as well as the occasional tombstone and oil derrick.

Fortunately for you, your radar shows the position of the approaching cars allowing you to avoid them or plot your escape. The radar also shows the cups, although they look the same as an enemy car. As an added twist you couldn’t just smash the accelerator to outrun your enemies, as this would cause the engine to overheat and the car to slow down.

This created a certain tension as you constantly monitored your fuel gauge while trying to outmanoeuvre rivals, and not overheat the engine.

Tranz Am Graphics and Sound

Visual Style

Considering the hardware limitations of the ZX Spectrum, Tranz Am’s graphics were impressive. The car sprites were detailed enough to be recognizable, and the map, though simplistic, conveyed the vastness of the environment effectively. Compared to other games on the Spectrum, Tranz Am’s visuals were quite advanced, with a good use of the limited color palette.

To provide a bit of variety, there was a “Night Driver” mode which would randomly occur at the end of a life, inverting the screen colours to provide a black background. This would have required a very low programming and memory overhead but was a great effect.

Sound Effects

The sound effects, while basic, added to the immersion. The rising hum of the engine as you accelerated, and the crash sounds when you hit a car or boulder were all part of the experience. Unlike modern games, there wasn’t much in the way of background music, but the minimalist sound design worked well, keeping you focused on the gameplay.
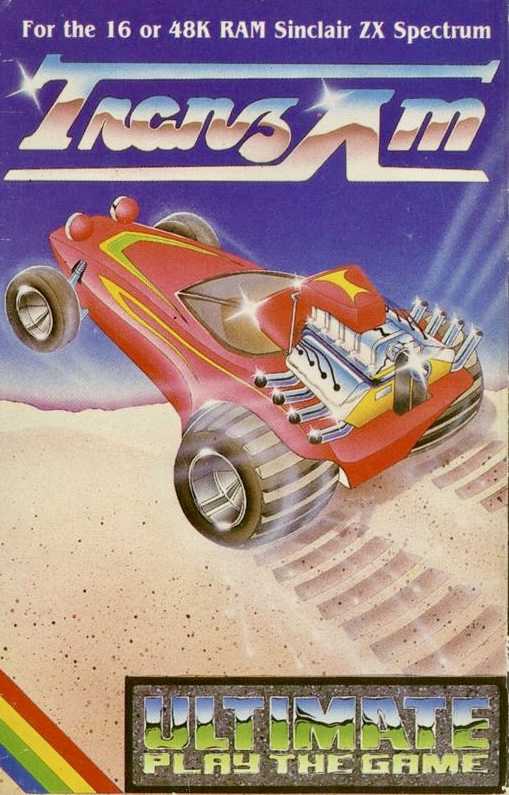
Cassette art for Tranz Am on the ZX Spectrum

Tranz Am Difficulty and Replayability

Level of Challenge

Tranz Am was no walk in the park. The difficulty curve was steep, especially for beginners. The controls were responsive but unforgiving, and it took a few crashes before you got the hang of maneuvering your car. However, this difficulty was part of the game’s charm. It felt rewarding when you finally managed to outlast your rivals and gather enough fuel to keep going and start collecting cups.

Strategies for beating Tranz Am

One tip is to always keep an eye on your fuel gauge. It’s tempting to speed ahead, but managing your resources is crucial. Another strategy is to learn the map layout. Certain routes are safer and have more fuel canisters, so memorizing these paths can give you an edge.

My personal strategy involved a lot of trial and error. I found that sticking to the edges of the map often yielded more fuel and fewer enemy encounters. It wasn’t foolproof, but it worked more often than not.

Complete the game by collecting all 8 cups, and you will be presented with a score and a time, with a game being completed in around 10 minutes.

Replay Value

Trans Am on the Spectrum garnered praise for its substantial replay value, a sentiment echoed by gaming magazines of its era. Reviews highlighted the game’s dynamic gameplay mechanics and the unpredictability introduced by its open-world format.

Magazines often emphasized how each session felt fresh due to the random placement of fuel canisters and enemy cars, keeping players engaged and challenged. This variability not only added to the game’s excitement but also encouraged strategic thinking and replayability, making Trans Am a standout early title in the ZX Spectrum’s library of games.
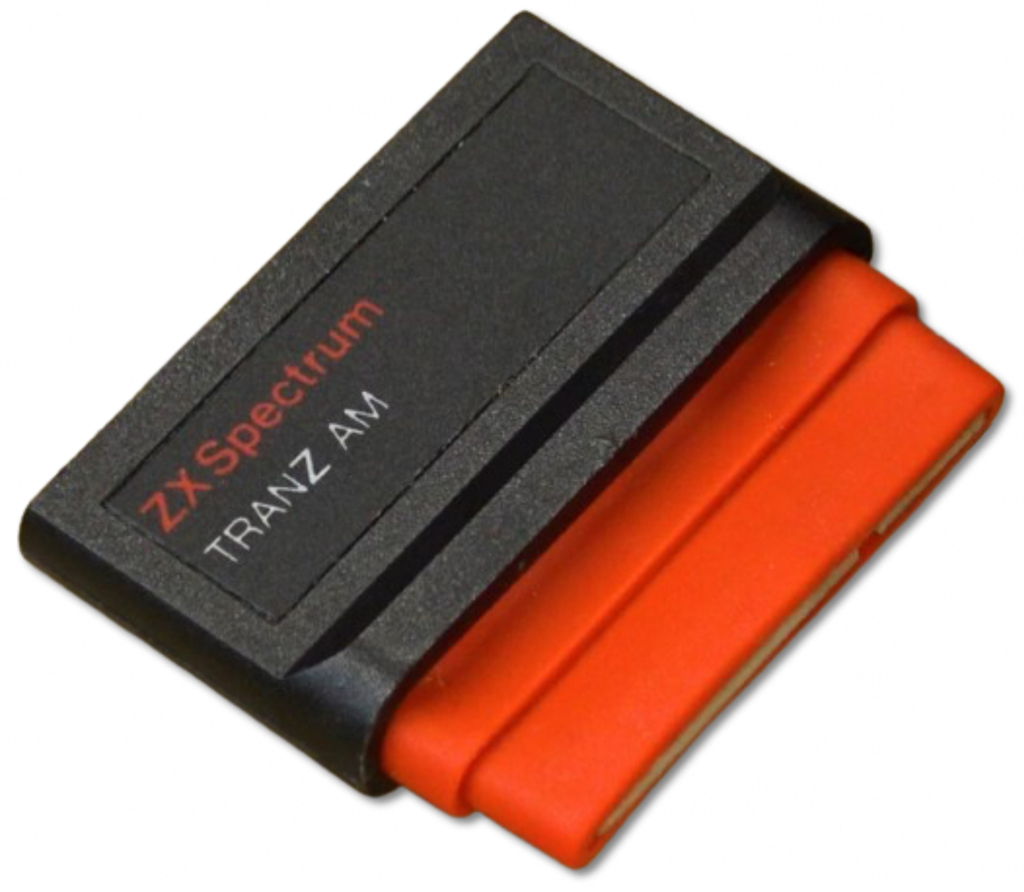
Tranz Am ROM Cartridge
Rare Tranz Am ROM Cartridge

Comparing Tranz Am with other ZX Spectrum Racing Games

Chequered Flag

Chequered Flag, developed by Psion and released in 1983, is a classic racing simulation game for the ZX Spectrum. It offers a surprisingly deep experience given the hardware limitations of the time. Players can choose from a variety of cars and tracks, each offering unique challenges and requiring different strategies to master.

The graphics, though simplistic by modern standards, are impressive for the ZX Spectrum, with detailed car sprites and well-designed tracks. The game employs a first-person perspective from behind the wheel, which was quite innovative for its era. The controls are responsive, allowing for precise handling, which is crucial in navigating the tight corners and straightaways of the tracks.

Chequered Flag for ZX S-ectrum
Chequered Flag by Psion

One of the standout features of Chequered Flag is its realism. The game simulates different car dynamics, such as acceleration, braking, and skidding, adding a layer of depth that was uncommon in many racing games of the time. The inclusion of a gear shift mechanism further enhances the simulation aspect, making the gameplay both challenging and rewarding.

The sound effects, while basic, complement the action well. The engine noise changes pitch as you accelerate and decelerate, adding to the immersion. However, the absence of music might make the experience feel a bit stark to modern players.

Pole Position

Pole Position, ported to the ZX Spectrum by Atarisoft in 1984, brings the classic arcade racing experience to home computers. As one of the earliest racing games, it set a high standard with its blend of fast-paced action and competitive gameplay.

Pole Position Screenshot Spectrum
Pole Position

Graphically, the ZX Spectrum version of Pole Position is quite basic, but it retains the essence of the arcade original. The car sprites and track elements are simplified, yet they convey a clear sense of speed and motion. The first-person perspective from behind the car adds to the excitement, and the colorful backgrounds, though rudimentary, are effective in creating a dynamic racing environment.

The controls in Pole Position are responsive, which is crucial for navigating the twists and turns of the Fuji Speedway track. Players must qualify in a time trial before competing in the main race, adding a strategic layer to the gameplay. Successfully weaving through traffic and avoiding obstacles while maintaining high speeds is both challenging and exhilarating.

Sound effects in the ZX Spectrum version are minimal, primarily consisting of engine noises and collision sounds. While these are rudimentary, they serve their purpose in enhancing the racing atmosphere.

Overall, Pole Position for the ZX Spectrum captures the spirit of the arcade original despite the hardware constraints.

Enduro Racer

Enduro Racer, ported to the ZX Spectrum by Activision in 1987, brings the off-road motorbike racing excitement of the arcade original to the home computer. While it can’t fully replicate the arcade experience, it offers a fun and challenging ride.

Graphically, Enduro Racer is impressive for the ZX Spectrum, with detailed sprites and varied terrain. The game uses an isometric perspective, providing a clear view of the track and obstacles. The bikes and riders are well-animated, and the sense of speed is effectively conveyed, even with the Spectrum’s limited graphical capabilities.

The gameplay is straightforward but engaging. Players control a motorbike, navigating through a series of tracks filled with jumps, bumps, and other hazards. The controls are responsive, allowing for precise handling, which is essential for avoiding obstacles and maintaining speed. The game requires a mix of speed and strategy, as players must manage their bike’s position and momentum to tackle the various jumps and rough terrain effectively.
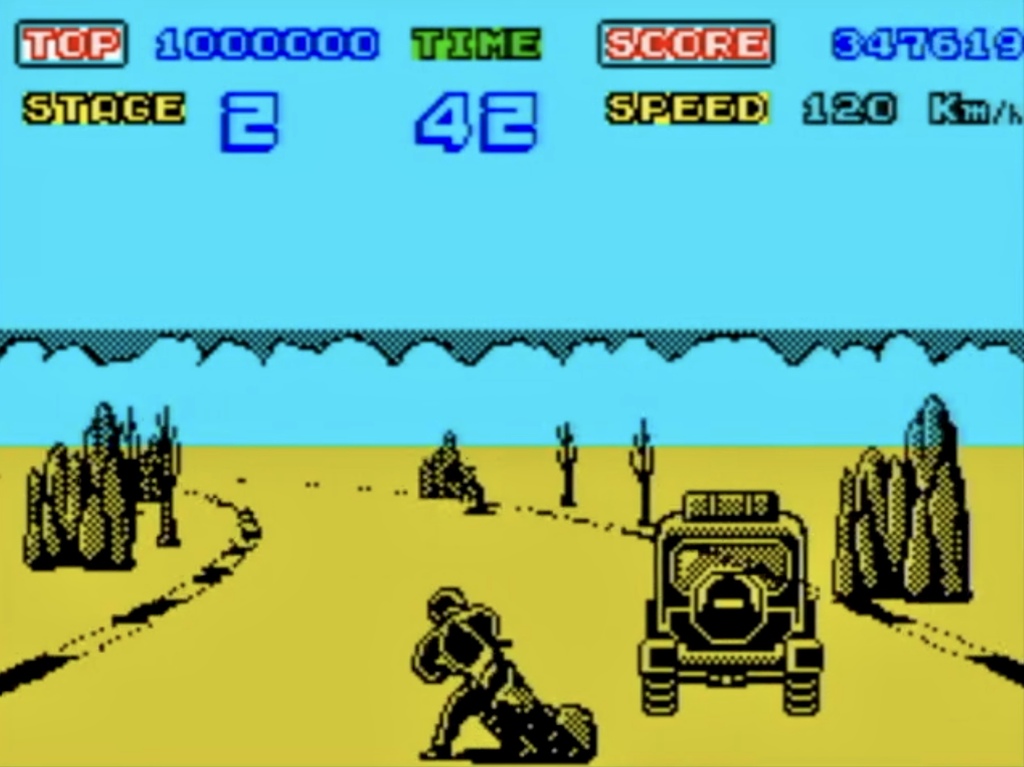
Enduro Racer Spectrum

Sound effects are minimal but functional, consisting mainly of engine noises and crash sounds. While not particularly immersive, they do add to the overall experience.

Enduro Racer’s difficulty level is well-balanced, offering a satisfying challenge without being overly frustrating. The game captures the essence of off-road racing and provides a good sense of progression as players advance through the increasingly difficult tracks.

Overall, Enduro Racer for the ZX Spectrum is a solid racing game that effectively translates the excitement of the arcade original to the home computer.

Pros and Cons of Tranz Am Compared to Peers

Pros:

  • Huge open-world map
  • High replay value due to randomised environment
  • Simple arcade-like controls

Cons:

  • Steep learning curve
  • Lacks driving realism compared to traditional racers
  • Lack of graphical variety

Tranz Am’s standout feature is its combination of racing and exploration. The post-apocalyptic setting adds a layer of excitement and tension, making it more than just a race against the clock. The game’s ability to mix adventure and survival is what makes it memorable.

Conclusion

While not a household name today, the 1983 ZX Spectrum game Tranz Am left its mark. This overhead racer, with its smooth controls and post-apocalyptic setting, was praised for its originality and accessibility. It helped establish developer Ultimate Play the Game as a force in early gaming and showcased the potential of the ZX Spectrum platform.

Sabre Wulf: ZX Spectrum Classic by Ultimate

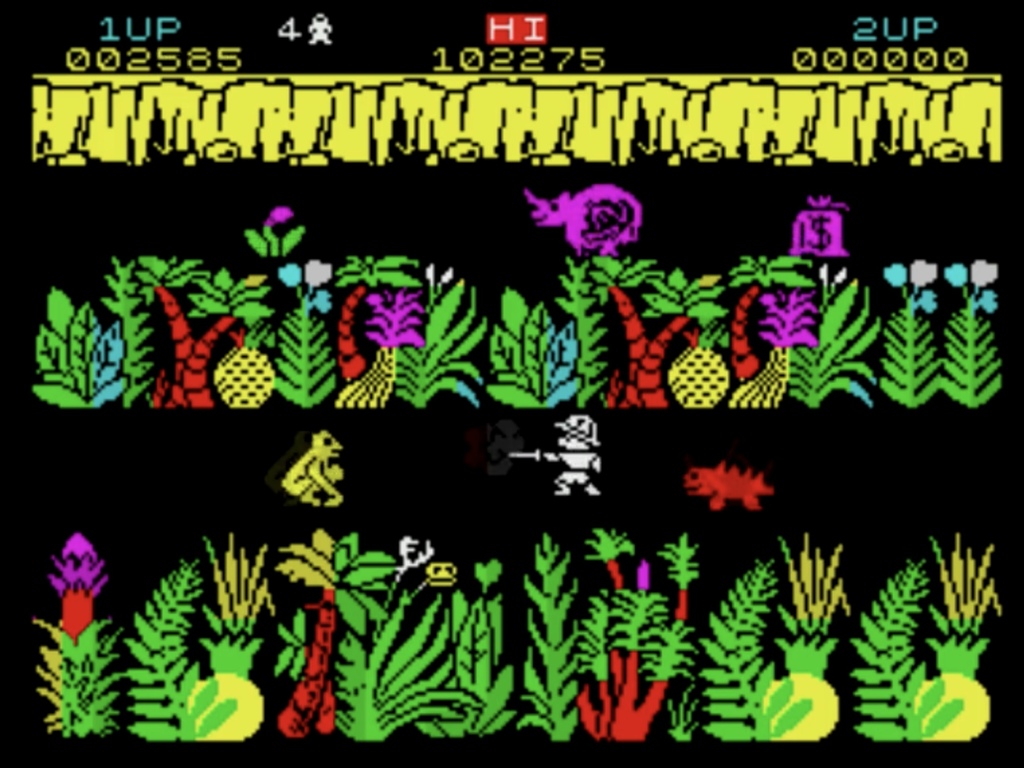
In the golden age of 8-bit computers, the Stamper brothers, Tim and Chris, carved their niche with innovative and action-packed titles for the ZX Spectrum. One such game, released in 1984, was Sabre Wulf, a unique adventure game that captured the imagination of gamers with its exploration, combat, and a touch of mystery. This article delves into the world of Sabre Wulf, exploring its origins, variants, critical reception, and the gameplay that made it a classic.

Gameplay gif of Sabre Wulf on the ZX Spectrum
Sabre Wulf Gameplay on the Spectrum IGIF)

Exploring the Jungle: Unveiling the Gameplay

Sabre Wulf placed players in the role of Sabreman, tasked with finding 4 pieces of a mysterious amulet, in order to pass the titular Sabre Wulf and escape the Jungle. The gameplay revolved around:

  • Maze Exploration: Sabreman navigated a vast, 256-screen jungle maze filled with obstacles, enemies, and hidden paths. The game used a “flick screen” mechanic, so effective in earlier game Atic Atac, where the background was static and the screen would “flick” to the next when the player approached the edge.
  • Combat: Using his trusty saber, Sabreman fought off various foes like bats, snakes, and spiders. Strategic use of the saber and careful timing were crucial for success. Some enemies could not be killed so had to be dodged or completely avoided.
  • Power-Ups: Scattered throughout the maze were orchids with random effects, some beneficial and some detrimental, adding an element of surprise and risk-reward.
  • Treasure: Score extra points by finding treasure, as well as gaining extra lives.
  • Amulets: The key to escaping the jungle lay in collecting four hidden amulet pieces scattered across the maze. Oh and finding the exit, a centrally located cave guarded by a mysterious native.

Sabre Wulf presented a unique blend of exploration, combat, and puzzle-solving, offering a satisfyingly, if a little repetitive, open-ended experience.

Sabreman attacks some innocent creatures

Sabre Wulf: Home Computer Variants

The game wasn’t confined to the ZX Spectrum. Here’s a look at its adaptations for other platforms:

  • Acorn BBC Micro (1984): A faithful port retaining the core gameplay but with slight graphical tweaks. The primary benefit over the Spectrum version was the avoidance of the colour clash that plagued the Sinclair machines graphics. This was however at the cost of a lower graphical resolution, and a strange “wide” screen layout.
  • Commodore 64 (1985): Developed by a different team, this version featured somewhat different visuals and sound effects. Zzap!64 magazine slated this version as having disappointing graphics, as well as being poor value for money, having been released 8 months after the original Spectrum version.
  • Amstrad CPC (1985): This port maintained the gameplay but with some limitations in color palette compared to the original Spectrum version.
  • TI99/4A (2014): A belated and unofficial conversion for the popular US home computer.
Sabre Wulf box for Spectrum
“Big Box” Sabre Wulf Packaging

Critical Reception: A Roar of Approval (Mostly)

Sabre Wulf on the ZX Spectrum received generally positive reviews, with some reservations. Crash Magazine (1984) awarded Sabre Wulf a respectable 83% score, praising its addictive gameplay,challenging puzzles, and atmospheric graphics. However, the reviewer noted the repetitive nature of the combat and the lack of a clear story.  Reviews in other publications echoed Crash Magazine’s sentiments, highlighting the game’s strengths and acknowledging its limitations.

Despite some critiques, Sabre Wulf garnered a loyal following, becoming a cornerstone title for the ZX Spectrum and solidifying the Stamper brothers’ reputation for innovative game design.

Pond screenshot of Sabre Wulf
Sabreman avoiding some spiders

Guide to Playing Sabre Wulf

Sabre Wulf on the ZX Spectrum is known for its challenging gameplay and lack of explicit instructions. Here’s a breakdown to help you complete it:

Goal

Collect four pieces of an amulet scattered throughout the jungle maze. With the complete amulet, approach the guardian at the cave entrance in the centre of the maze to win.

Exploration

The maze is large and interconnected. Explore every nook and cranny to find the amulet pieces and other helpful items such as treasure and extra lives. Avoid the Wulf who patrols a lane at the bottom of the maze and can’t be killed, only outflanked. With very little direction you will either need a good memory, or like most gamers of the time, draw a map!

Avoid Danger

The jungle is full of enemies like spiders, scorpions, and the elusive Sabre Wulf himself. Touching them will lose you a life. Using your sabre you can kill most of the baddies, but remember you can only swing your sword to the left or right, so you need to be careful running up or down the screen. Watch out for the sleeping hippos which block the paths, they can be poked awake but will stampede! Avoid loitering in a screen too long, this creates roving forrest fires which kill Sabreman on contact and can’t be destroyed.

Power-ups

Sabre Wulf on the ZX Spectrum doesn’t have traditional power-ups in the sense of permanent upgrades. However, it features Orchid flowers that provide temporary benefits, some of which have nasty side-effects:

Sabreman looking a bit Blue
  • Yellow: Destroys all enemies on screen but leaves Sabreman briefly incapacitated (immune to enemies during this time).
  • Red: Grants temporary invincibility but slows Sabreman down.
  • Purple: Provides invincibility for a short time but inverts controls (left becomes right, up becomes down).
  • Cyan: This is the one to have – offers both invincibility and increased speed (turbo boost).
  • White: Neutralizes the effect of any other active orchid.

Trial and Error

There’s no in-game map or guidance. Learning the maze layout and enemy patterns comes through exploration and repeated attempts. Think of it as an 80s Roguelike but without the pervasive power-ups!

Sabre Wulf sequels from Ultimate

Ultimate (later Rare) released a number of titles in what became the Sabreman series between 1984 and 1986, although they followed very different formats:

  • Underwurlde (1984): Following his escape from the jungle, Sabreman finds himself in a hostile underground world. This side-scrolling platformer tasks him with finding three weapons to defeat three guardians and ultimately escape the Underwurlde.
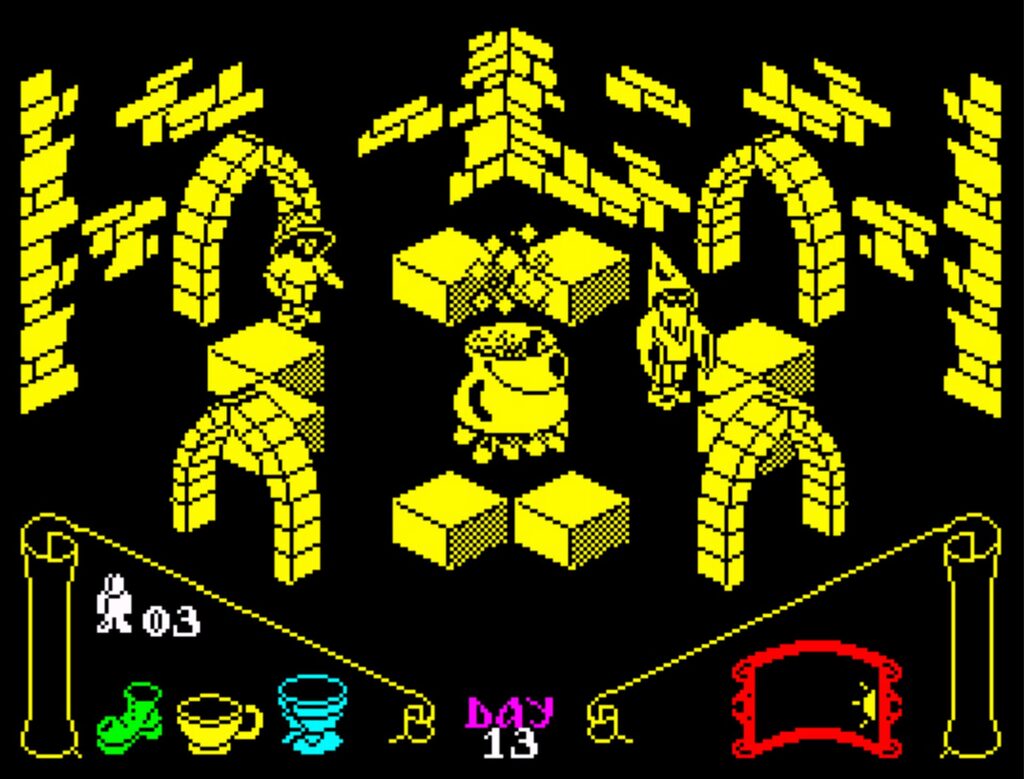
  • Knight Lore (1984): Sabreman is infected with lycanthropy after escaping the Underwurlde, and must find a cure for his condition. This isometric adventure game puts him in a castle filled with traps and puzzles, and where he turns into a werewolf during full moon.
  • Pentagram (1986): Now a seasoned adventurer and a fledgling wizard, Sabreman embarks on a quest to find the powerful magical artifact known as the Pentagram. This isometric adventure game features magic-based combat and puzzle-solving elements.
Knight Lore for the Spectrum
Knight Lore Isometric Graphics
  • Mire Mare: This planned sequel to Underwurlde or Pentagram never saw the light of day. Little is known about its intended gameplay or story, as it was cancelled around the time of the partial takeover of Ultimate by US Gold. It is however mentioned at the end of the aforementioned games.
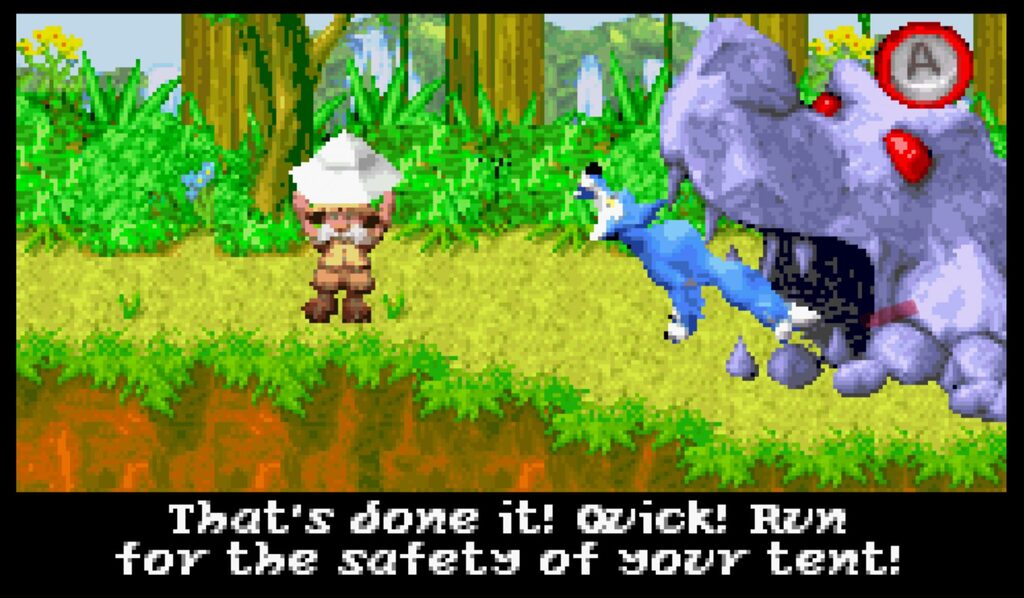
  • Gameboy Advance Remake. In the Rare (Ultimate sister company) 2004 remake for the Game Boy Advance, Sabre Wulf takes Sabreman, the explorer, on a treasure hunting adventure once again. This time, a shattered amulet frees the villainous Sabre Wulf, and it’s up to Sabreman to recapture him and reclaim stolen riches.
GBA version of Sabre Wulf
Sabre Wulf remake on Gameboy Advance

Lasting Impact of Sabre Wulf

Sabre Wulf for the ZX Spectrum introduced some interesting concepts for it’s time, while not necessarily packed with groundbreaking technical innovations:

  • Price and Packaging: Ultimate Play the Game priced Sabre Wulf significantly higher than their usual games. This bold move aimed to combat piracy by making owners more protective of the expensive software. It also established their now-iconic unadorned “big box” packaging style.
  • Storytelling: The game didn’t hold your hand. There were no tutorials or explicit instructions. Players had to figure out the goal (collecting amulet pieces) and mechanics through trial and error. This approach to storytelling became more prominent later on, but was less common in 1984.
  • Large, Colorful Game World: The 256-screen maze offered a vast and visually appealing environment for a ZX Spectrum game. This created a sense of exploration and discovery for players.  The Stamper brothers claim that Sabre Wulf’s exploration and item collection mechanics might have influenced The Legend of Zelda (1986), although this is very much up for debate.

While not revolutionary, these elements helped shape Sabre Wulf into a memorable and influential title for the ZX Spectrum.

Sabre Wulf Links

Crash Magazine Review https://www.crashonline.org.uk/06/sabre.htm

Zzap!64 Review http://www.zzap64.co.uk/cgi-bin/displaypage.pl?issue=007&page=054&thumbstart=0&magazine=zzap&check=1

Did The Stampers Really Think Miyamoto Copied Sabre Wulf With Zelda? https://www.timeextension.com/news/2024/05/did-the-stampers-really-think-miyamoto-copied-sabre-wulf-with-zelda

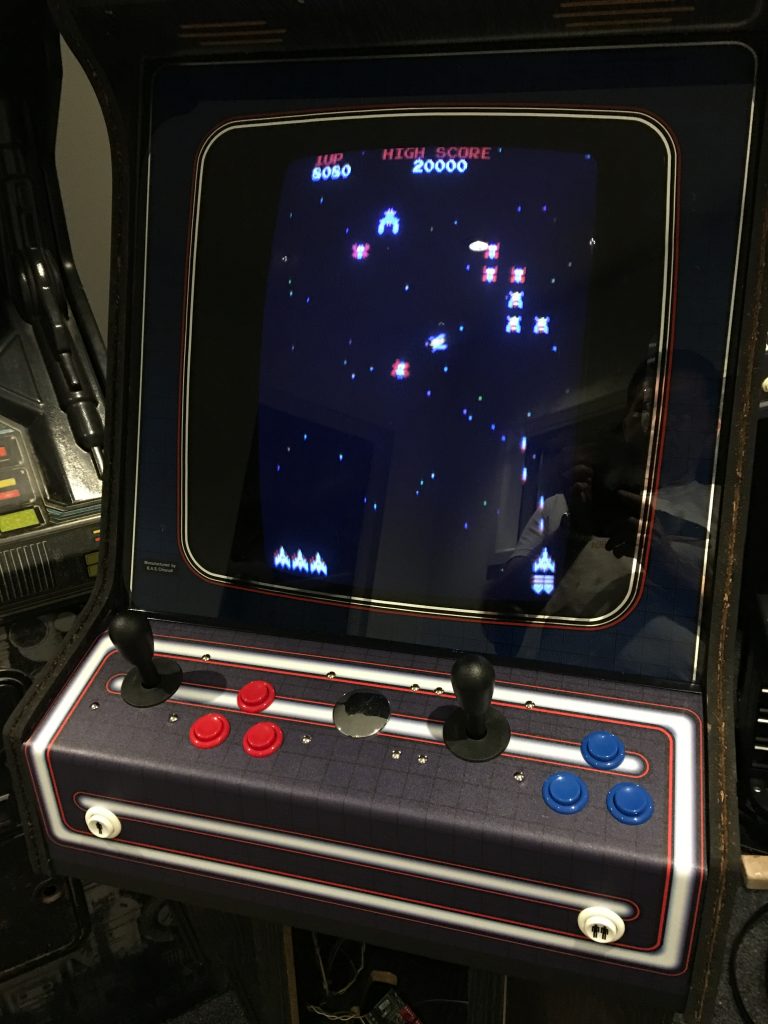
BAS Arcade Cabinet Restoration

After I built my arcade shed, I went on a bit of a buying spree, snapping up knackered old cabinets on eBay without much thought as to what I would do with them. I just knew that I had a space that needed filling with cabinets, and that I needed to learn how to restore them. I didn’t want to be just a player of old arcade games, I wanted to learn what made them tick and how to bring them back to life.  The BAS arcade cabinet was my first.

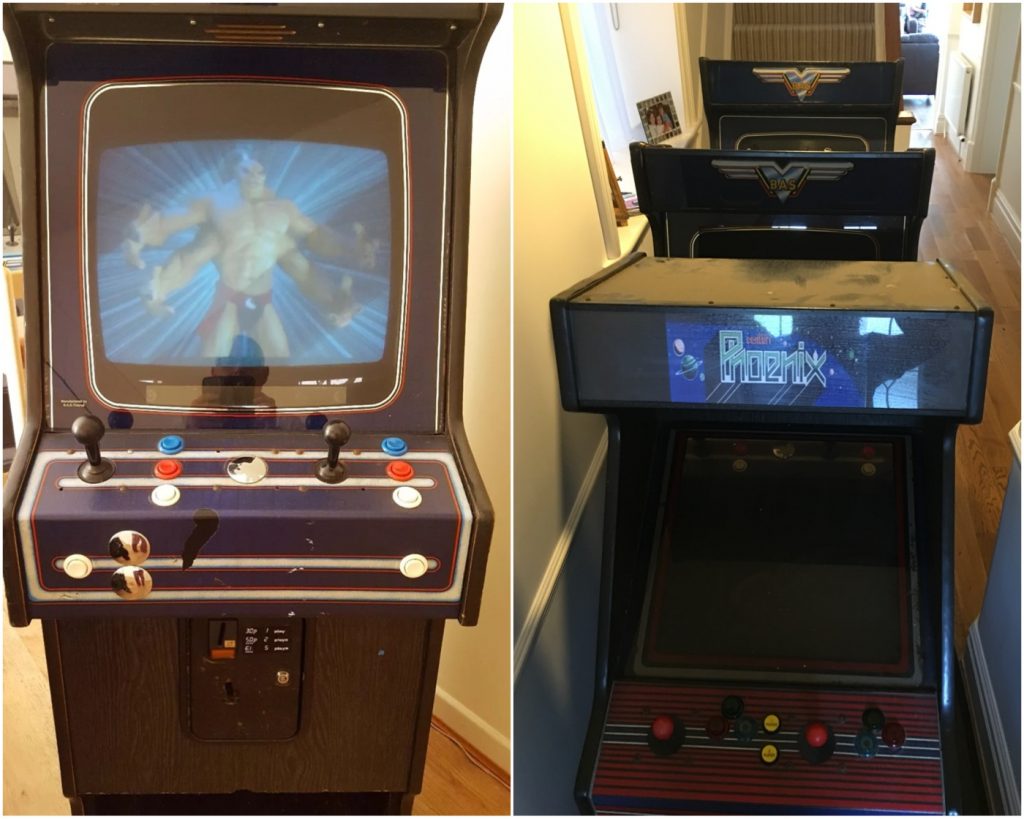
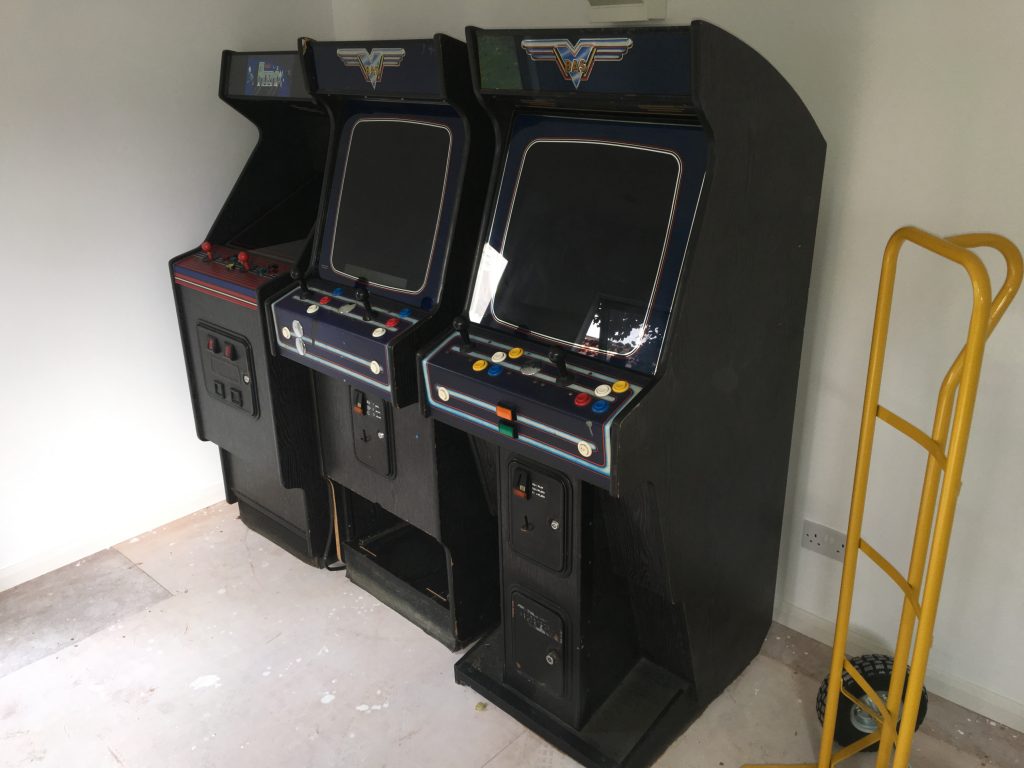
My initial purchase was a semi-working machine with a bootleg Mortal Kombat installed, this lovely old BAS branded cabinet, manufactured in the UK. I had seen a few of these knocking about on the UK forums, so I figured there would be enough people around that knew how they worked. Plus there might even be some spares available if I needed them. I managed to pick up this particular example for less than £100, a real bargain for an largely unmolested machine with what appeared to be a working monitor and PCB.

Martin the Van Man (UK king of arcade removals) delivered my BAS Arcade Cabinet along with a couple of others that I had managed to buy within a 2 week period. My first challenge was how to get them out of my hallway and down the garden before my wife came home.

Original eBay listing, and delivery day

Cunningly I managed to buy 2 virtually identical BAS cabinets, thinking that I might be able to make one perfect machine from parts salvaged from both, should it come to it. I also managed to acquire another Electrocoin Midi, a great little cabinet that may or may not include my favourite game, Phoenix. But that’s another story.

The 2 BAS cabs and the Electrocoin Midi make it down the garden to the arcade shed

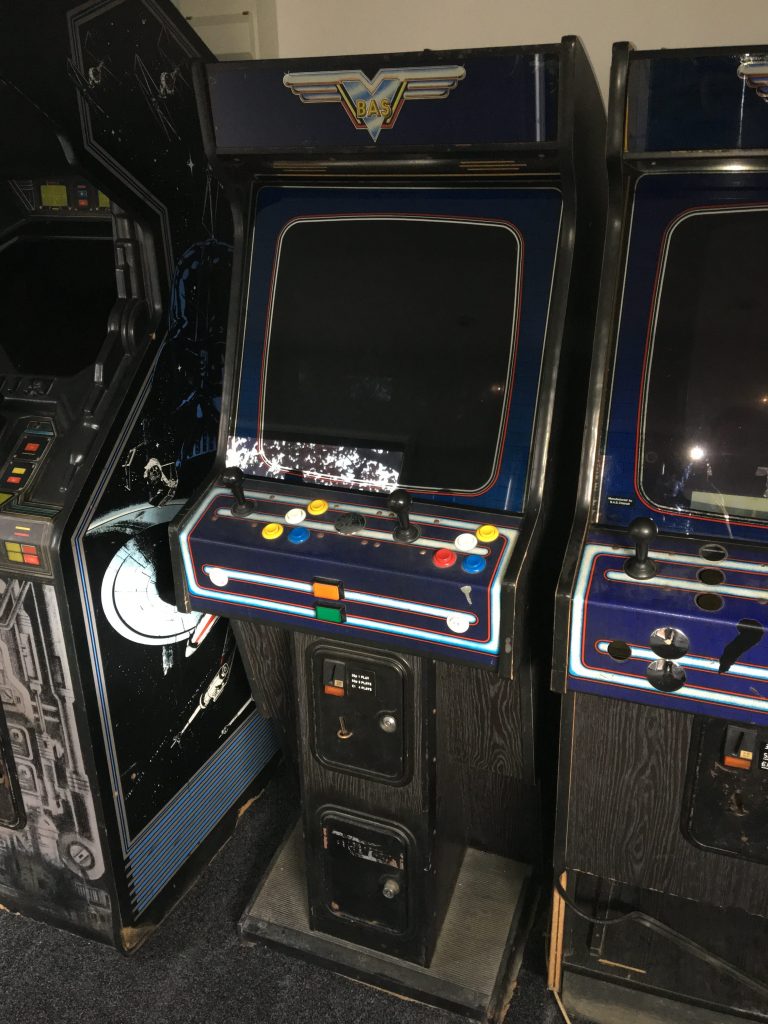
Safely installed in the shed, my first job was to survey both the BAS cabinets and work out which one I was going to tackle first, and the problems I would need to address. I decided that I liked the look of my donor cabinet the best, as it was actually in better physical condition than the Mortal Kombat cabinet, albeit with an untested monitor and a botched control panel.

So my to-do list became:

  • Install a multi-game PCB
  • Test and fix the monitor
  • Repair or replace the control panel, joystick and buttons
  • Fix the damaged wood on the base
  • Remove all the metalwork and respray
  • Replace the rubber matting on the footrest
  • Replace the coin door locks (missing keys)
  • Find a replacement marquee light

This was going to take some time, but I was looking forward to a project that would give me experience of every aspect of restoration, not just the cosmetics but the electronics that power these old games.

BAS Arcade Cabinet Awaiting Restore
The BAS donor cab awaiting restore

Fixing the BAS Arcade Monitor

The cathode ray tube is the heart of these old machines, something that can’t be replicated with modern flat screens, and I was determined to keep this original monitor in place.  The other BAS machine had a working monitor but I wanted to find out what it would take to bring one back to life.

First job was to test the power supply, which was producing healthy voltages to both the JAMMA connector for the game PCB, coin door and control panel (5V) and to the marquee light (12V) according to my multimeter.  I had a working 60-in-1 game plugged in with flashing LEDs so I knew there was nothing wrong with the video signal being produced to the monitor.   The monitor was however showing no signs of life, and no “glow” in the neck, so I decided that the chassis would need to be removed and repaired.

This provided me with an opportunity to test out my new HV Probe, as the tube needed to be discharged before safely handling the monitor chassis due to the high voltages that can be retained by old CRTs. After donning my wellies and pink Marigolds (not joking), and with one hand behind my back to prevent my body becoming part of a circuit, I gently placed the probe under the anode cap.  Nothing.  No spark, no crackle of discharge, nothing.

Comfortable that I wasn’t going to kill myself, I removed the chassis from the monitor, making sure I took pictures of all the connections so I would be able to reverse the procedure later.

Hantarex monitor chassis
The poorly monitor chassis looking a bit worse for wear

I didn’t really know where to start with the repair of the chassis, so I cleaned it up with some cotton buds and some isopropyl alcohol, and sent it off to a contact on the UKVAC forum. Repairs to my Star Wars arcade machine have susbsequently taught me a lot about monitors, but at this stage I didn’t have the equipment or know-how. So I figured while the monitor chassis was being repaired I could focus on the cabinet itself.

Control Panel Repairs

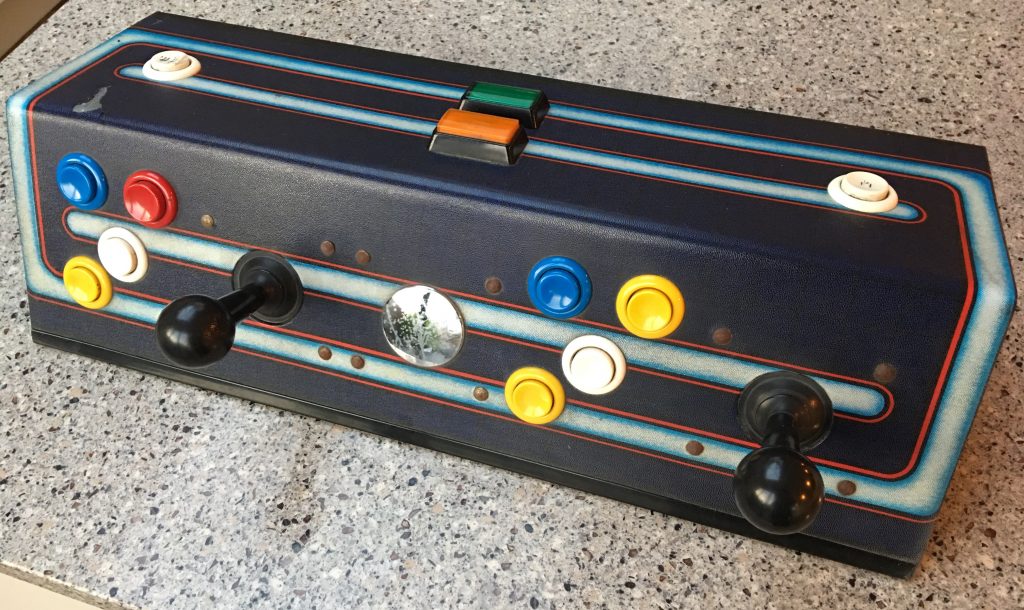
The control panel on both BAS cabinets were less than ideal, one with a standard but weird vertical button arrangement, the other with extra buttons hacked on, presumably to play Mortal Kombat. Asking around the forums I found someone with a spare BAS panel, one with a button configuration that I was happy with.

BAS Control panel
Original BAS Control Panel with strange button layout

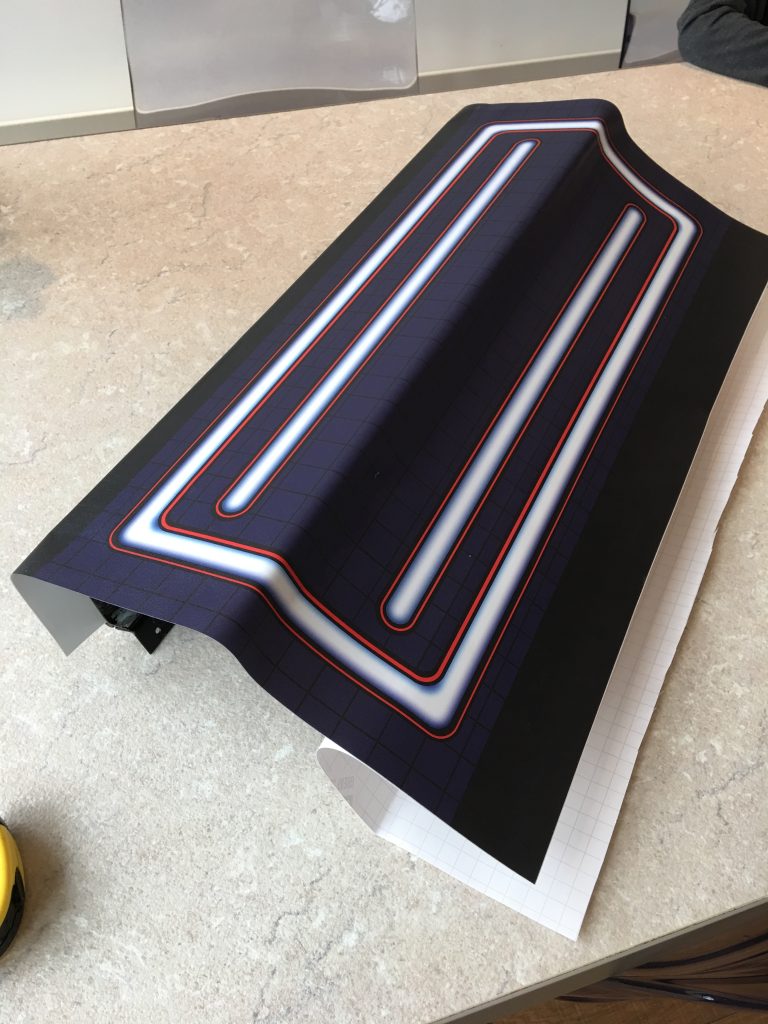
The control panel overlay had seen better days, so I decided that I would need to repair or replace it. Back to the forums, and although there was no off-the-shelf replacement available in the original design, I found a chap who was prepared to make a copy.

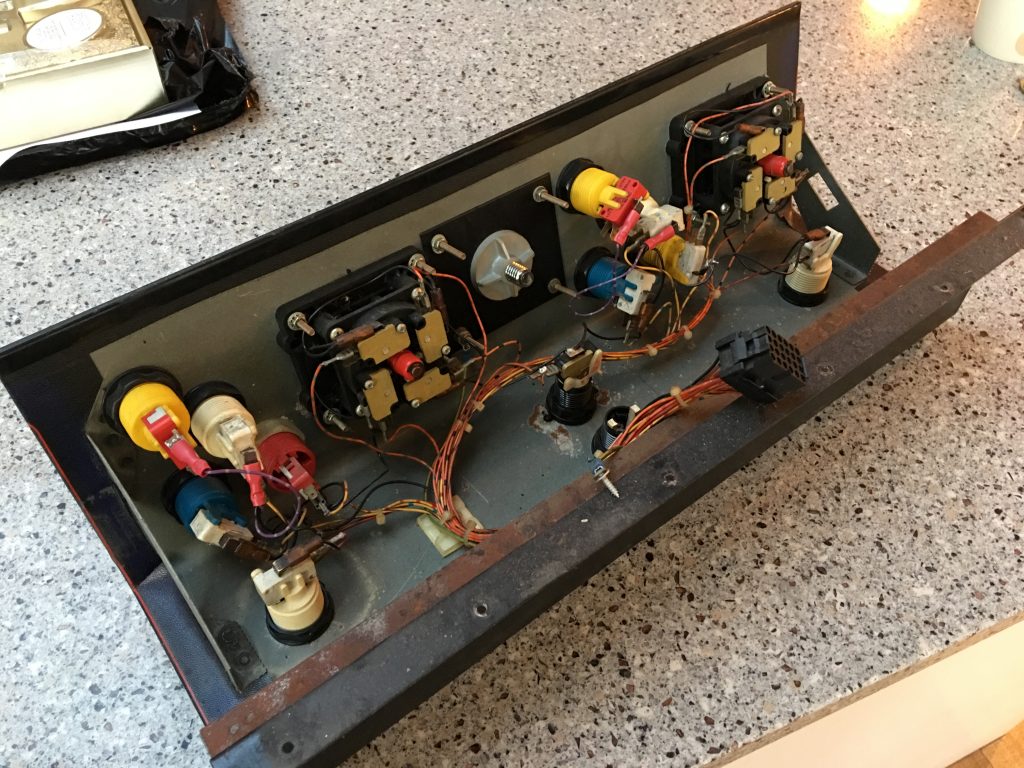
The wiring harness in the control panel was however complete and had a molex connector for easy replacement, so I documented the wiring layout taking lots of pictures, and set about carefully removing the old buttons and joysticks. The joysticks were mismatched and a bit worn, so I planned to replace with some stock 8-way items that had left over from a previous MAME cabinet project along with some shiny new buttons. The blanking plate that covered the extra joystick hole would be salvaged and cleaned up with some Brasso in leiu of specialist plastic polish.

BAs Control Panel Wiring
The wiring of the existing control panel before removing buttons and joysticks

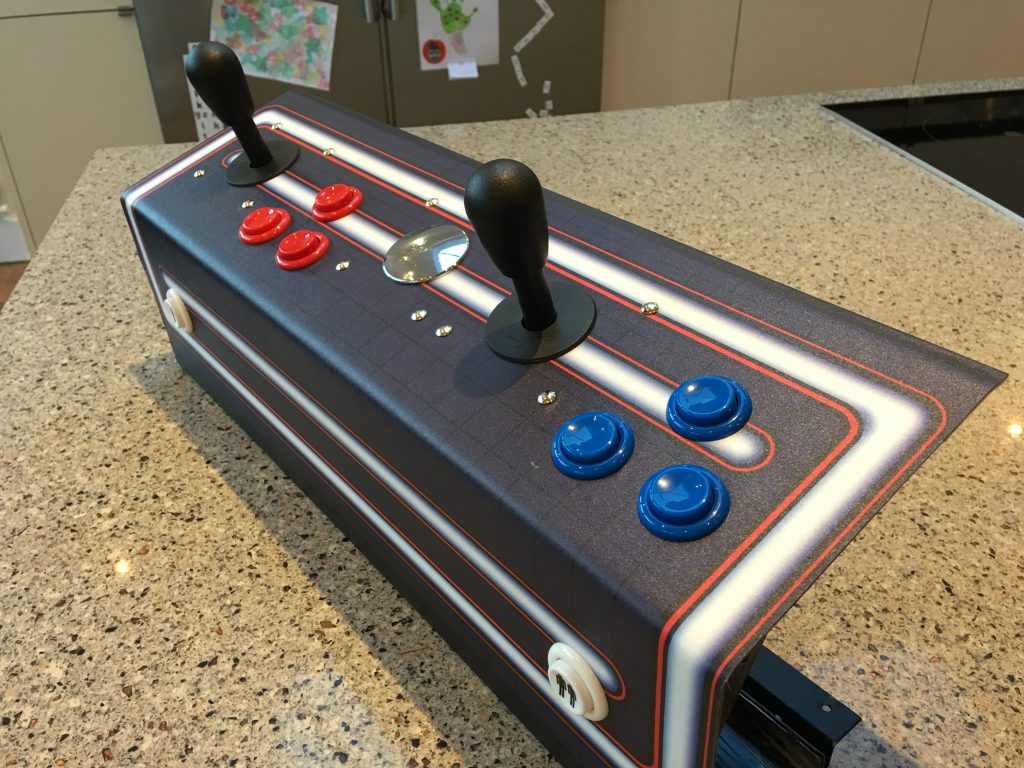
A few weeks later and my replacement panel overlay arrived (thanks Olly from the Arcade Art Shop) looking fantastic. I treated the replacement control panel with some rust converter to tidy up any corrosion on the bare metal, and gave it a good wipe down with white spirit to remove any remaining adhesive residue and dirt that would prevent the new overlay from sticking. I then carefully applied the overlay, making sure I smoothed it down as I went and lining it up with the visible area of the control panel. Once applied, I then cut out the joystick and button holes with a craft knife, leaving some overlapping triangular sections to tuck into the hole.

BAS Control Panel
Applying the repro control panel overlay

Then the most satisfying part, pushing the buttons and the joysticks through the newly covered panel and securing with plastic nuts and shiny new chrome bolts. I was really pleased with the result, basically a good as new finish with every visible surface and component replaced, while keeping all the original internals. Now the control panel was perfect, I needed to address some of the problems with the cabinet itself.

Completed BAS Control Panel
The replacement control panel with repro overlay, new joysticks and buttons

Repairing the BAS Arcade Cabinet Woodwork

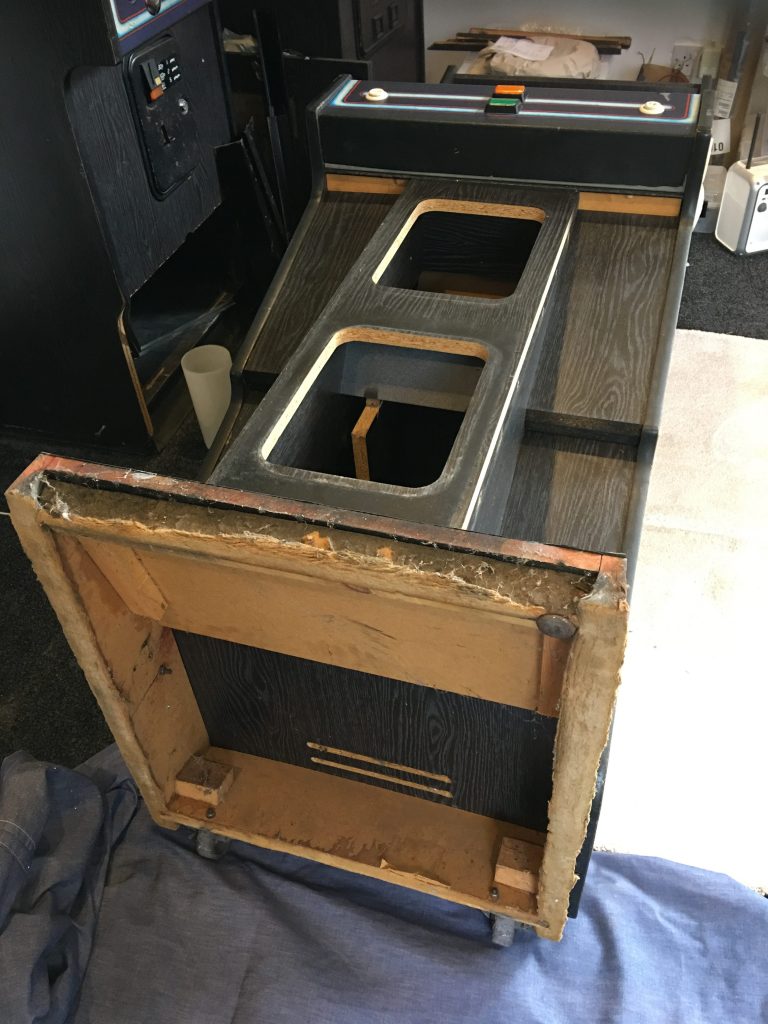
I had noticed when moving the cabinet around that there was some bulging in the cabinet edges, mainly in the bottom part of the cabin where the wood had possibly got damp and the glue holding the fibreboard together had decayed. So I tipped the cabinet onto its back (making sure the monitor and glass was secured correctly) to survey the damage.

BAS Cabinet with damaged wood base
The base of the cabinet before the damaged wood is repaired

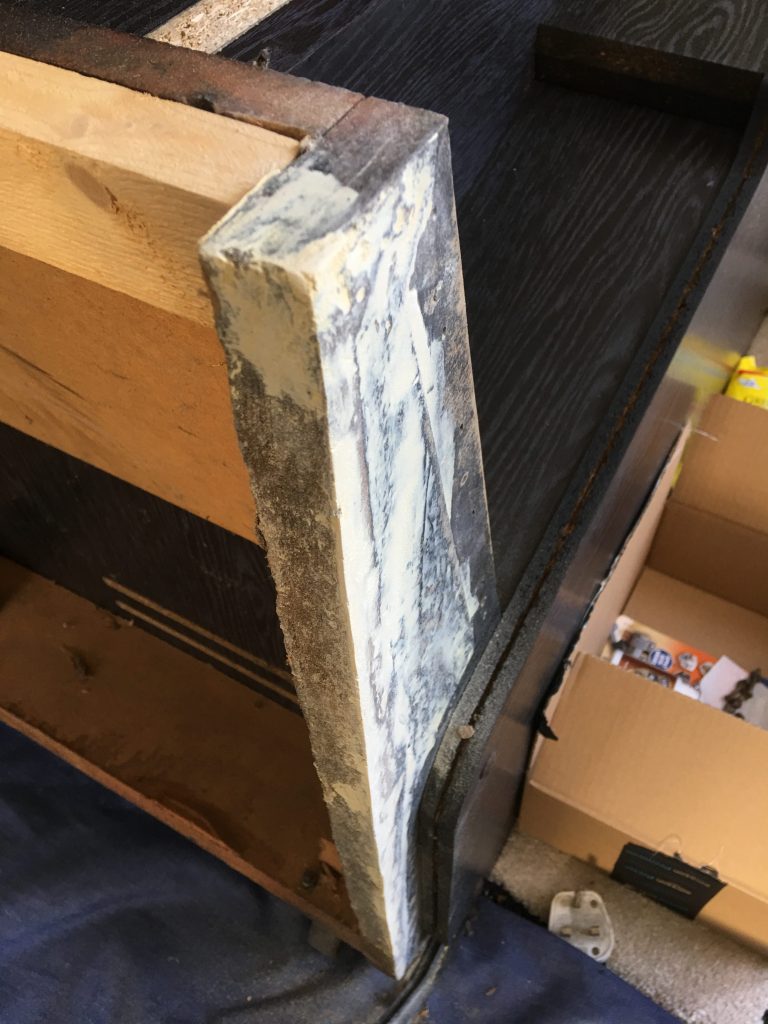
Looking at the bottom it was fairly sound, but would need some work to stabilise the spread in the board and prevent further damage, as well as improving the looks. I removed the loose material with a file and then applied a wood hardener to the remaining surfaces to “glue” what was left together, with the help of some clamps to push the spread wood back into place. After drying, I sanded away any remaining protruding wood, and then filled with a high performance wood filler to level the surfaces and fill any holes. After a couple of rounds of filling and sanding I was happy enough with the base to prime and paint Matt black. As most of the base is hidden with rubber mat or metal plate, it didn’t have to be perfect, just tidy.

Repaired base of BAS arcade cabinet
Based hardened, filled and sanded ready for painting

While I had the cabinet on its back I took the opportunity to remove the t-molding and all the remaining metalwork including the coin doors so they could be treated for rust and cosmetic damage. There was a lot of visible rust and bubbling of paint so I decided to take back to bare metal rather just touching up. This is a job that many arcade restorers like to outsource, by sending the components off to a sandblaster and powder-coater for treatment, but I wanted to get my hands dirty on this first project. Which will be the subject of my next update, as this one is getting a bit long!

But before I finish this update, I thought I would share the most exciting part of the build, as at this stage in the restoration I received an important package.  The monitor chassis was back from repair, and after careful reinstallation, sprang back to life on the first power up without needing any adjustment.

BAS Cabinet with monitor
The BAS Cabinet with newly repaired monitor chassis installed

Up Next in Part 2

So next up in part 2 of this restoration blog will be the coin doors and other metalwork, the t-molding and bringing the marquee light back to life.  I’ll then assemble all the refurbished parts of this lovely old BAS arcade cabinet ready to play some classic games.

Huge thanks to gunblade from the UKVAC forum and Olly from arcadeartshop.com for their help with the restoration.

Grandstand Munchman 80’s handheld review

Who created the Munchman Handheld?

Anyone who has read my blog before knows I am a big fan of retro handheld games, and Munchman from Grandstand was a great example. Many of these games attempted to recreate the big arcade games of the time, which explains the proliferation of space invader clones, including the likes of Galaxy Invader and Astro Wars. The Space Invaders game format translated relatively well to the VFD handheld games, due to the relatively simplistic graphics, and that fact that the invaders and the player character didn’t occupy the same space on the game screen.

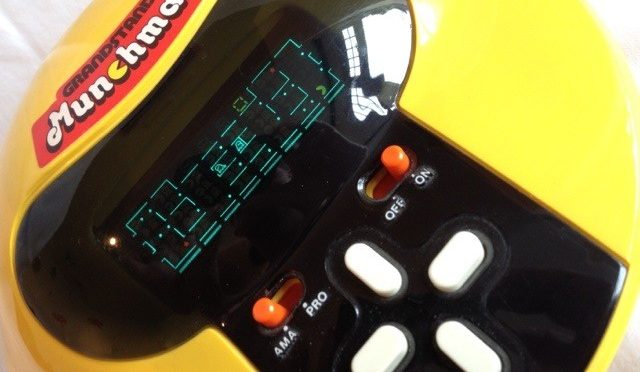
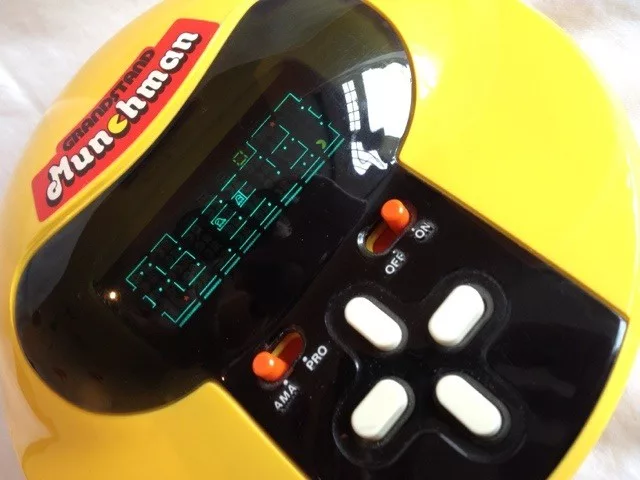
Grandstand Munchman

When it comes to replicating a maze game, and of course we are talking about Pac Man, the graphical challenge is much greater using a VFD screen. As well as having to create a realistic looking maze, you also have a playfield that requires the player character, the enemy ghosts and also the pac pills to be represented in the maze at the same time.Grandstand managed to achieve this with the classic Munchman, delivering a great Pac Man clone that stays true to original despite the limitations of the format.

Grandstand Munchman Design

The game itself is large and round, like a dinner plate, in a bright shiny yellow, a clear reference to it’s Pac Man heritage. Rather than using a joystick, which would have stood out against the smooth surface of the game, 4 directional buttons were used to control your Munchman. The only other switches are the on / off switch, and a difficulty selector that dicates the speed of the chasing ghosts.

Grandstand Munchman
Grandstand Munchman Handheld

The gameplay is as you would expect, albeit with a smaller maze and fewer ghosts, with the objective being to clear the maze of pills before being caught by the chasing spooks. Eating a red power pill would make the ghosts flash, and allow you to eat them for bonus points. The one thing that does however stand put about the gameplay is that your Munchman always faces to the left, regardless of which direction he is travelling, and can only eat going left, resulting in some back tracking needed to eat all the pills. Helpfully there is still a short cut, so you can continuously travel right to left and reappear on the other side of the maze. To accompany the gampelay there is a great soundtrack, typically loud as all Grandstand games tended to be, with jaunty intro tunes and in game effects.

Mini Munchman

Mini Munchman

Much like the Grandstand Scramble handheld, Munchman also had a smaller LCD based sister, predictably titled Mini Munchman, which aped the yellow case if not the classic round shape.  Both games were very popular, and due to the rock solid build quaility can still be found in working order on ebay.  In fact its difficult to believe these games are 30 years old, and can still be played today.

A “must have” for any retro handheld collector.

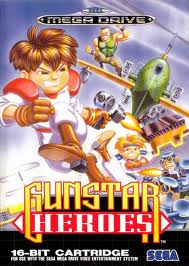
Gunstar Heroes for the Sega Megadrive

The Sega Megadrive was never short of great games, but developer Treasure managed to create a smash with Gunstar Heroes, it’s very first commercial release in 1993. Back then the name Treasure was relatively unknown, well before they received worldwide acclaim for games such as Bangai-O, Sin & Punishment and Ikaruga.

gunstar heroes megadrive case
Gunstar Heroes for the Sega Megadrive

Gunstar Heroes uses the horizontal run and gun format familiar to players of Contra, Metal Slug and Forgotten Worlds, scrolling left to right with multiple platforms and routes through each level.  An over-complicated game intro establishes that your heroes “Red” and “Blue” have to cross deserts, aerial platforms, caverns and huge battleships on a mission to rescue Red’s brother “Green” from the evil “Black”.

Gunstar Heroes Gameplay

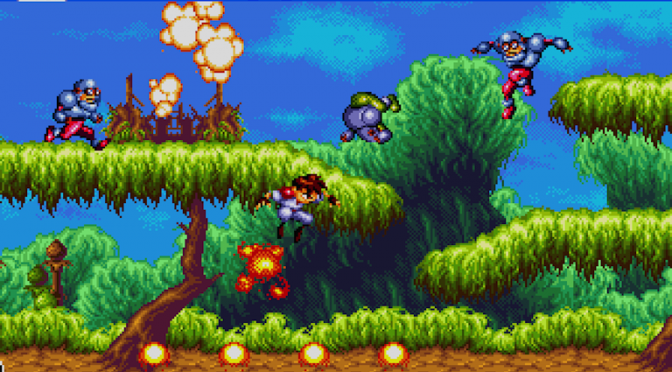
There are 7 levels to complete, each featuring unique locations and level bosses, and a whole bunch of minor enemies and mini-bosses to defeat along the way. In fact so many that the screen sometimes seems filled with sprites, projectiles and huge blooming explosions, all of which dont seem to incur any kind of slowdown from the 16 bit heart of the Megadrive.

Gunstar Heroes Megadrive
Gunstar Heroes – Explosions!

You can choose from 4 weapons, Force, Lightning, Fire and Chaser, which can be combined to make hybrid weapons, which give different perks and allow for different playstyles. In two player mode you can even work in tandam, throwing each other at weaker enemies being another way of destroying them as well as the huge bosses.

Bucking convention, you could pick from any one of 4 levels to start, allowing you to take different routes through the game should you get stuck, which due to the advanced difficulty levels, would often happen. Death would come when you took a certain number of hits and drained your power bar, giving you the opportunity to quit the game or return to the start of the current level.

As with all Treasure games to follow, the sprites were incredibly detailed, and they wrestled every last inch of processing power out of the Megadrive, with the kind of graphical scaling and rotation normally associated with the FX chip augmentented Super Nintendo.

Gunstar Heroes Bosses

Gunstar Heroes Cavern Level
Gunstar Heroes cavern level

Some of the stand out moments include the “sand” boss, created from shifting blocks of sand forming different shapes including a “running man”, a Treasure hallmark, with this character also featuring in later shmup Radiant Silvergun.  There is also a “boardgame” level full of bosses, and a mine level featuring an Indiana Jones style minecart chase.

Playing Gunstar Heroes Today

Getting hold of Gunstar Heroes these days is hampered by its relative rarity and cult status, but you can still obtain a copy on ebay for around £20, and you can also find it on the Sega Megadrive Classic Collection, with 3 other games – which bizarrely is cheaper.  360 owners can also download from XBOX Live Arcade.

There was also a sequel, Gunstar Super Heroes on the Nintendo Gameboy Advance, which had great reviews but didn’t achieve the same cult status as the Megadrive original.

Whilst not selling in the volumes it deserved, due to Treasures’ lack of previous form at the time, and any kind of marketing muscle – it just couldn’t compete with the kind of money being spent on the Blue Hedgehog.  For lucky gamers who did stumble upon it, they got to experience one of the great games of the 16 bit era, and the birth of a developer who would go on to be recognised as one of the greatest.

For more Megadrive classics visit my Top 10 – the Best Megadrive Games Ever!

Strider Arcade Retro Review

Strider Hiryu – Capcom’s Arcade Hero

My first introduction to Capcom’s Strider was not through the arcade cabinet, but the excellent Megadrive port, which was like nothing I had seen before, with it’s huge sprites and fantastically varied levels and incredible bosses – it was an arcade revelation.  At it’s heart, Strider is a side scrolling beat-em-up, but that simple description does the game a huge injustice.

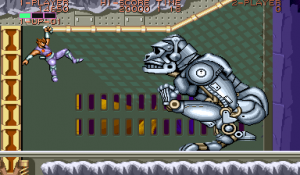
Strider - mechanical monkey
One of the more impressive bosses
Set in a futuristic world, your “Strider” Hiryu must leap and slash his way through 5 levels in order to defeat the evil Meio, whose army has taken control of several European states.  The mission begins with Hiryu flying in on his hang-glider, before he leaps into action in the first level, a Russia themed location.  The first thing that grabs you is the size of the characters and the detailed animation, with Hiryu able to leap directly upwards, or cartwheel left of right.  He can also grip onto platforms above him, grappling across chasms, and perform a sliding tackle move.  His main weapon is a light sabre that is used to perform rapid slash movements to dispatch enemies.

To help Strider Hiryu on his way, various power-ups can be obtained including wingmen in the form of a small robot, a big metallic cat and a mechanical hawk, each of which feature their own special moves and animations.

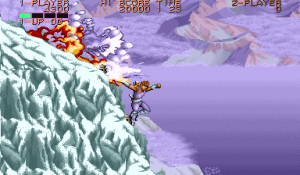
Stride Arcade Hill Section
Strider Arcade – Hill Section

The five levels include the Russian location, snowy Siberia, a flying warship, the jungle of the Amazon and finally Meio’s Moonbase.  Each level is distinctly different in terms of the format, the enemies and tactics required to complete, and within each level there are mini-bosses, as well as end of level bosses, depicted using hugely detailed sprites.  Stand out bosses include a terminator-style mechanical gorilla with a huge reach, and a looping snake monster that needs to be beaten by jumping on it back.

Strider Megadrive / Genesis Console Conversion

One thing you realise very quickly is that it is HARD.  Strider only has 5 levels, but to see all of them will have cost you a few 10p pieces back in the arcade, as death was frequent and certain points in the game were very tough to navigate.  Thankfully the Megadrive port was incredibly faithful to the arcade orginal, and allowed you to perfect your technique without costing you a fortune. In fact the console conversion was so good it made it into my list of Top 10 Megadrive / Genesis Games.If you haven’t had the chance to play Strider, I recommend this is the best way of sampling one of CAPCOM’s finest games and a real retro classic that represents the pinnacle of 2D arcade gaming.

Strider 3 – the Return of Strider Hiryu on PS4 and Xbox One

Due to the popularity of the original Strider games, the series received a reboot in 2014, entitled simply Strider, but for the purposes of this article I’d call it Strider 3. The game was launched for the latest XBOX One and Playstation 4 platforms, as well as the last generation XBOX and PS3, and followed the original Strider story, as Hiryu battles against the evil Grandmaster Meio.

I’ve yet to play this version, but it’s on my growing list, and it will be interesting to compare this version of the Strider universe with the fantastic arcade original.

Thanks to The Games Shed for recording this video specially for me, please pay the shed a visit at www.thegamesshed.co.uk.