

The Arcade Shed Build – Part 1
Why build an Arcade Shed?
I’d been planning to build an Arcade Shed for a while before actually taking the plunge. Growing up in Essex in the 80’s, I had easy access to some of the best arcades in the UK, with Southend being a 25 minute drive from my home in Grays. Every Friday my friends and I would head up the A13 in an old Ford Capri owned by my friend Jason, and hit the arcades on the Southend sea-front. It seemed then that there were new arcade games every week, dedicated games that were almost impossible to replicate on the home consoles and computers of the time (although the BBC Micro did a good job).

30 years later and the arcades are still there, but the games are all gone, replaced with 2p coin pushers and slot machines. A few retro arcades have sprung up, most notably Arcade Club in Bury, and the Heart of Gaming in London. Southend even has its own retro gaming Mecca in the form of Astro City, which has some great retro cabinets. But with a full time job in London and 4 kids I can’t head off to Manchester every time I want to experience an 80’s arcade.

So I decided to create the real thing in my garden, my own Arcade full of favourite 80’s games. I’m calling it the Arcade Shed, as that’s what it’s going to be – a big shed. It needs to be big enough to fit in my favourite games – at least 4 or 5, plus room for at least 1 pinball table. It needs to be insulated and heated to protect the sensitive electronics from the cold and damp, and just as importantly allow me to play all year round.
Arcade Shed : The Games
As far as the games are concerned, I had a shortlist although this was always going to be subject to change, I was warned by other collectors that you always end up with more than you planned, but these were my “must haves”.
The arcade game shortlist
- Star Wars Arcade – Bought this one already, cost a fortune, currently with broken monitor and in need of a few cosmetic repairs
- Track & Field – I’ve bought an Electrocoin Cabinet to house this game, and a dedicated control panel. Just waiting for the PCB to come back from being repaired by a contact on ithe UKVAC forum.
- Snow Bros – Have the PCB already and a BAS Jamma cabinet to house this in, just needs a bit of tidying up. Played this to death at our grotty student union bar at Aston University.
- Centuri Phoenix – Looking for a dedicated original cabinet for this, my favourite shooter and first arcade obsession
- Outrun (Midi size) – The classic driving game, didn’t have this cabinet when I build the shed but have managed to find one since, and it’s is awesome!
- MAME Cabinet – probably vertical format, to play all of the other games that I can’t fit in! Will need a Jamma cabinet to house this, and I want to play on an original arcade monitor. Not decided between a PC or a Raspberry Pi, or a 60 in 1 board
- Pinball – Addams Family, my absolute favourite and also will be another really expensive purchase
- 2p count pusher – will be essential in making the arcade family friendly, the kids and wife just love these games. Very expensive as still used in arcades and making money for the operators

That’s quite a long list with some rare and sought after cabinets in it but I’m not expecting to have my arcade complete overnight, this is going to be a long term project.
Planning the Build
After a lot of internet searching, and considering the potential lifespan of the arcade shed, I settled on an actual shed which I would restrospectively insulate to turn into more of a permanent structure, as opposed to a pre-fabricated garden building. I estimated that a garden room was going to cost me around £10k for the size I was looking for, whereas a heavily modified shed would cost me half as much – albeit with a bit more work involved.
The building would need to house the gardening equipment such as spades and mowers, as my shed would be replacing an exiting smaller structure, so I went for a combo deisgn that had an integrated “shed-in-a-shed” with a separate door. After pacing out the space at the bottom of my smallish town garden, I worked out I could have 17 foot by 10 foot structure, with a Pent design that was taller at the front to allow my arcade games to be pushed against the back wall. I would have minimal windows to allow for better insulation, and also to recreate the arcade feel and not have too many reflections on the screens. After a trip to the local garden centre I ordered the bespoke shed, which would come with optional insulated floor and ceiling, double glazed windows and doors, and an updated rubber roof.
Assembling the Arcade Shed
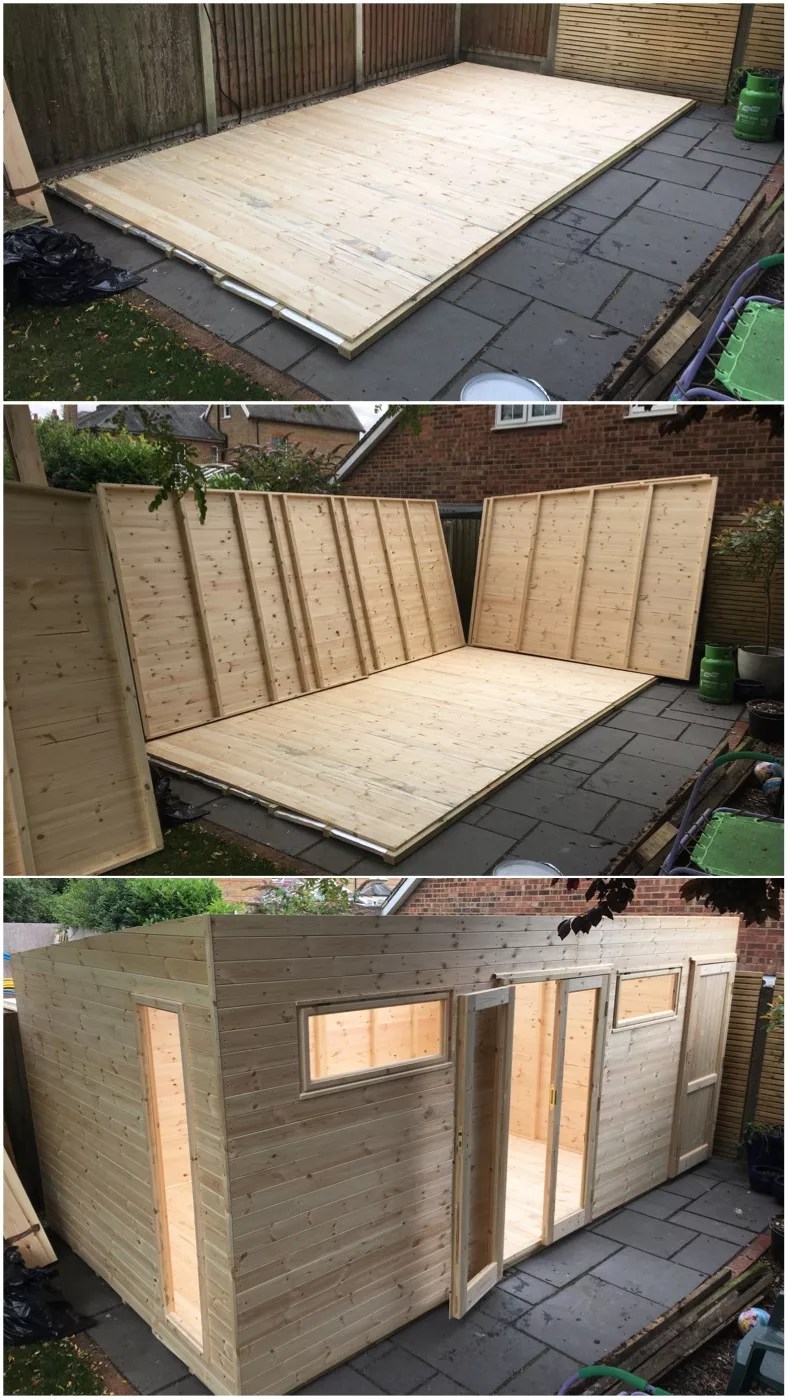
After an agonising 8 week wait for my shed to be fabricated, and a frantic last minute demolition and sales of the old structure, the arcade shed arrived, and was carried to the back of the garden in panels. I was reassured by the grunts and groans of the shed builders, who complaining about the weight of these extra height insulated panels. I thought the roof sections would never get around the back of the house, they were so big.
Just and hour later and the shed was fully constructed and ready to move in!

Arcade Shed Interior
Having waited 8 weeks for my shed to arrive I wasn’t going to hang about waiting for it to be completed, so i got working on the outside straight away. My experience with sheds was that painting them made them last a lot longer and was greater protection against the elements, so I had the shed delivered untreated, and quickly painted the whole thing with primer.

My summer holiday wasn’t going to stop progress, so I booked a local decorator to paint the shed with exterior emulsion while I was away and booked both a sparky and a builder to fit out the interior. While I am fairly handy and could have done this all myself, I am aware of my time limitations with a busy job and 4 kids, so elected to employ professionals.
Arcade Internal fittings

The builder put in celotex insulation panels in the walls followed by a sheet of plywood lining, which he then left for the sparky to fit the electrics – a consumer panel and a truck load of plug sockets as well as dimmanle led ceiling lights and external lamps. Then the plasterboard went in, and the electric sockets completed. I also elected to have a further sheet of plywood put over the floor, to help distribute the weight of the arcade machines.

Flooring for the arcade
i procrastinated on the floor covering, with many people advocating wooden floors for ease of movement of the cabinets, and other suggesting carpet was the only way to go. In the end I settled on industrial carpet tiles, which would be easy to lay myself and also allow me to replace any damaged by 200kg arcade machines being constantly dragged over them. The carpet tiles went in with minimal effort, and I am very pleased with the result, very hardwearing and don’t seem to mind the beating they are subjected to.

As soon as I had the carpet in, I moved in my collection of cabinets, such as it was at the time. Thankfully they fit nicely in the space, and the carpet seemed very happy having these huge bits of wood dragged across them. There was just enough space at the back of shed for the tallest of my arcade cabinets, which meant I could use the whole of the back wall and fit in maybe 6 or 7 in total.

So I have a completed arcade shed, painted, insulated and ready to use. In part 2 I will be looking at the games themselves, and how my collection has changed since the shed was first built. My first arcade game was a renovated BAS Arcade cabinet, you can read about the restoration here.
I hope this has inspired you to consider your own build, if you have any questions contact me via Twitter @retrogamesnow.
For further inspiration check out these sheds from the Shed of the Year website.


Excellent work and looks like an actual room, rather than a shed. One of the poshest shed cades I’ve seen!
Thank you Vic, I wanted it to not look like the inside of a shed or a garage, somewhere to tide me over until I build that house with the huge basement!